Key takeaways
- Fence post rotting starts at the base of the post, so fixing drainage and lifting wood off the ground stops most problems before they spread.
- You can patch small rot spots with epoxy or hardener, but if the post feels mushy all the way through, it’s time to dig it out.
- Sealing your fence every few years and sloping soil away from posts keeps water from sneaking in and wrecking everything again.
Your fence is leaning. The bottom of the post feels soft. There’s mold creeping in or cracks near the bottom.
If you ignore it, you’ll end up replacing the whole thing or watching it fall in the next storm.
But it doesn’t have to get that far.
These seven fixes can stop posts from rotting early and save your fence. They’re best for fence posts that still have solid wood left.
You’ll also learn how to keep rot from coming back, so one repair doesn’t turn into five.
Catch early warning signs of fence post rotting before it’s too late
Walk the fence line and test each post. Press on them. A solid wood fence post should stay firm.
Look where the post meets is placed in the ground. That’s where rot starts. Watch for green slime, black stains, soft wood, or deep cracks.
Take a screwdriver and poke just above the soil. If it sinks in or the wood breaks apart, the rot’s already inside.
Catch it early, and the fix is simple.
If you wait too long, you’ll be hauling out concrete while your neighbors watch from their decks.
Fix #1: Keep wood wood off of post from getting wet with soil

Wood rots fast when it sits in damp soil. The bottom few inches are always the first to go.
A metal post anchor keeps the wood above ground level. The bracket sets in concrete and holds the post up without touching dirt. No contact with moisture means the rot stays out.
They’re a smart option if you’re planning a fence installation or just replacing a rotted fence post.
If you’re starting from scratch, installing with anchors helps stop rot before it even starts. For replacements, cut the old post flush and drop the rest into the anchor.
Use galvanized or powder-coated steel to coat the post. It won’t rust and lasts longer outside.
You get more years out of your fence without replacing the whole thing.
Fix #2: Patch soft spots before they spread

If the post looks rough but still feels solid, you might not need to replace it.
Scrape out the soft spots with a chisel or flathead screwdriver. Go until you hit firm wood. Then brush on a liquid wood preservative to strengthen what’s left.
Once that sets, fill the gap with an exterior-grade epoxy. Smooth it out so water doesn’t collect there again.
Let it cure all the way. Then sand and seal it with outdoor paint or stain.
This works best on rot that’s less than half an inch deep. If it goes further, you’re better off replacing the post.
Fix #3: Use gravel for drainage around the fence post hole

Water sitting at the base of a wood post will break it down over time.
Dig around the post about 6 inches to 12 inches deep and wide. Remove any packed or soggy soil.
Backfill with crushed stone or coarse gravel. Press it down as you go to keep the post steady.
Gravel helps water drain away instead of soaking into the wood.
Don’t set the post too low in the dirt. The more that stays inches above the ground, the less chance of hidden rot.
It’s a small change that makes a big difference.
Fix #4: Wrap the base with waterproof tape
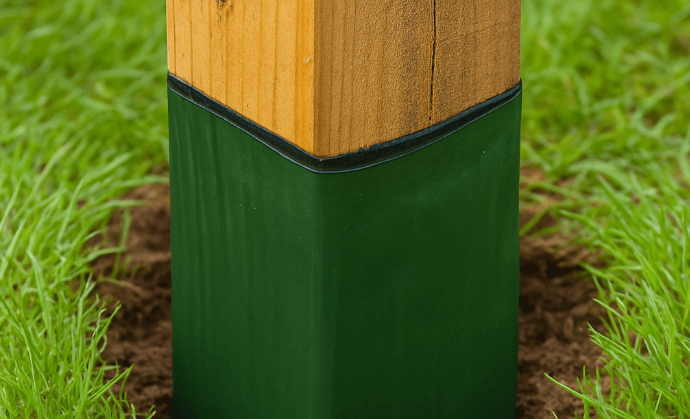
Bitumen-based barrier tape works like a shield for the base of the post.
Wrap it tightly around the part of the post starting from the end and extending several inches above the ground. This keeps the wood from holding moisture directly.
It’s useful on new posts and older ones that are still in good shape.
Pair it with gravel or a metal anchor, and you’ve got long-lasting, solid protection against rot.
It’s quick to apply and can help extend the life of your fence without much effort.
Fix #5: Reinforce loose posts with brackets

If a post feels loose but isn’t rotting yet, brace it before it gets worse.
Metal L-brackets or U-shaped stabilizers can lock it in place. They bolt into the solid part of the post and connect it to nearby fence boards or rails. Use lag screws and a sledge hammer or drill to make sure everything stays secure.
Once it’s in, check for movement. The post should feel solid and steady.
This fix won’t stop fence posts from rotting, but it gives you time to plan a full and proper repair. It might also be enough on its own if the post is still in good shape. If you’re not sure how bad it is, call a professional fence repair service that can take a look and let you know what’s worth saving.
Don’t ignore the wobble. It can lead to cracks, and once water gets in, the damage spreads fast.
Fix #6: Swap out any post that’s falling apart

Some fence posts can’t be saved. If they feel soft, crumble when touched, or have visible holes, it’s time to replace them.
Cut off any attached panels. Dig around the base and break up the cement using a post hole digger, shovel or pry bar. If that doesn’t work, rent a jackhammer.
Dig the hole at least 24 inches deep, and deeper if you’re in a cold climate. For durability, drop in a pressure-treated 4×4, treated lumber, or naturally rot-resistant redwood.
To protect it further, wrap the post in the ground with waterproof tape or a postsaver sleeve. Then set it in gravel with a bit of concrete for stability, allowing the water to drain away from the post.
Keep it level and secure while it cures.
This method helps prevent future wood rot, giving your new fence a stronger start.
Fix #7: Seal wood every couple of years

Even treated fence posts will eventually get wet and break down over time if left unsealed.
Apply an oil-based wood preservative every one to three years. It penetrates the timber and blocks moisture, helping to extend the life of the post.
Clean the fence first. Then apply with a brush or sprayer on dry days, starting from the top and working downward.
Pay special attention to the bottom of the post, that’s where water holds and damage begins.
A little home improvement effort now saves you from big repairs later.
Build smarter next time and make it last
Not all lumber is created equal. Cedar and redwood hold up better because they naturally resist decay. They cost more upfront but need less work over time and stay solid longer.
Working with a wood fence installation company is a smart move if you’re starting fresh and want something that holds up.
If you want to skip the hassle completely, vinyl fence installation is the way to go. No sealing. No checking for soft spots. Just set and forget.
If you’re starting from scratch or replacing a section, this is the time to upgrade. It saves time, repairs, and money later.
Use pressure-treated or chemically treated wood when you build a fence, and always slope the ground slightly away from the post.
Make sure water drains well and doesn’t collect around the post. Water that sits near the post and the concrete leads to faster decay.
When possible, dig the hole with proper draining, wrap the wooden posts, and keep at least 6 inches of the post above the ground.
This all adds up to stronger, more long-lasting fences that need fewer repairs.
Use these tips before rot takes over
Rot happens, but it doesn’t have to take down your whole fence.
If you catch it early, most posts can be saved with simple fixes. Even if one needs replacing, it’s still better than tearing out an entire section.
From patching soft spots to setting new fence posts the right way, the goal is the same: keep water out and structure strong. Materials matter, but so does how you install and maintain them.
If you’re not sure what can be saved or just want someone else to handle it, working with a fence company in Lafayette can make the process easier. They’ll take care of repairs, replacements, or full installs and help you figure out what makes the most sense for your fence.
Whether you do it yourself or call in help, don’t wait. A little work now saves you time, money, and headaches later.
Fence posts are built to last. The right care will make them stay that way.